

Start by drawing another 1" square, but be sure to leave enough room on your sketchbook page to keep developing from this first square. Assuming you're using a book of at least 8x10", leaving yourself 3" of space above the top side of the square and 4" from the left side to the page edge. Once you have this square drawn, place the point of your pencil in the top left corner and draw an arc down and counterclockwise to the bottom right corner. Try to make this arc as if it were a quarter of a circle.
Step 2 picks up right from here and you continue working from the first square. You do not start another square!

If the top right corner of your square had a hinge or pivot point and the right side were able to swing up and to the right it would describe an arc. Also, if you continued the top edge to the right for another inch and ended it where it met the arc you would have the image above.

There are a couple of ways to work to this stage; draw an adjacent square and then the arc or continue the top edge for an additional inch and then draw the rest of the square and then draw an arc within. Either way, you should end up with two squares connected into a rectangle with a half-circle within.

This is where things get a little different. Instead of drawing another 1" square, you're drawing a 2" square. The top of your rectangle becomes the bottom of the square. I really recommend drawing the square and even quickly checking with a ruler for the first time or two you do this. When the square is done, you continue the arc from the top right corner of the rectangle to the top left corner of the new square. The arc you're drawing here is approached exactly the same manner as the previous two you've drawn; as if it's a quarter of a 4"x 4" square.
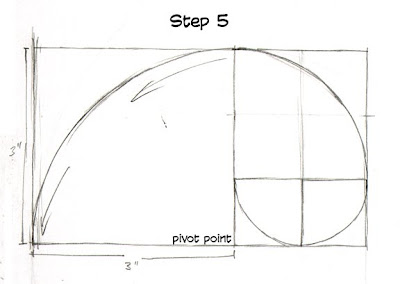

With step 5, we're appending another square to what we've already drawn. This time it's a 3" x 3" square on the left side of the just finished 2" x 3" rectangle. The arc is drawn as before: as if it were a quarter of a 6" circle.

This is the last step for a number of reasons; another square won't fit in the typical sketchbook and we're trying to get this done in fifteen minutes or less. We're drawing a 5" square adjacent to the bottom of the 5"x 3" rectangle and, again drawing an arc. You'll end up with a 5" x 8" rectangle with a nicely drawn spiral arc.
Apart from getting comfortable with one of the more interesting elements of composition, you'll be further developing your ability to guage distance as well as develop more line control as you draw both longer straight lines and increasingly larger curves.
I really appreciate seeing the work you guys have been doing, but it's killing my inbox right now. If you'd like to share it with me and anyone else, I suggest getting a free account at someplace like photobucket or flickr and drop a link in the comments section so everyone can follow your progress.
~R
~R
No comments:
Post a Comment