Showing posts with label how to draw. Show all posts

Friday, 11 February 2011

Simplified Line Weight for Drawing

I made the following handout for my 1st year students.  It supplements a lecture and white board demonstration of a few elements, but I thought there's enough info on its own to make it worth sharing as is.  In many ways it's LINE WEIGHT FOR DUMMIES as it doesn't come with the full theory and explanation behind it.  It's kind of a Mister Miyagi approach;  do this and eventually you'll know Karate.  Or something like that.


Saturday, 3 January 2009

Exercise 3

After a week of drawing squares followed by another week of drawing circles within them it's time to push things further forward. Taking your developing hand-eye coordination and growing ability to measure by visual comparison we're going to take a big jump forward while getting an indroduction to something called The Golden Ratio. I'll probably get around to talking about the Golden Ratio again at some point, but the wiki link should act as an acceptable intro to it.
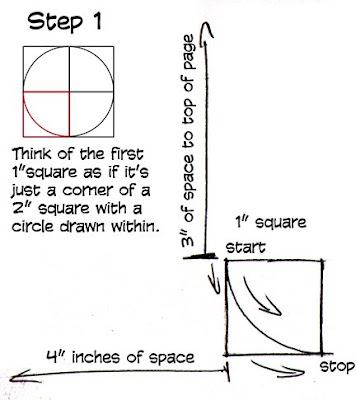


Start by drawing another 1" square, but be sure to leave enough room on your sketchbook page to keep developing from this first square. Assuming you're using a book of at least 8x10", leaving yourself 3" of space above the top side of the square and 4" from the left side to the page edge. Once you have this square drawn, place the point of your pencil in the top left corner and draw an arc down and counterclockwise to the bottom right corner. Try to make this arc as if it were a quarter of a circle.


Step 2 picks up right from here and you continue working from the first square. You do not start another square!
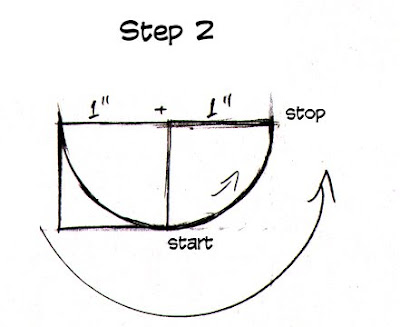

If the top right corner of your square had a hinge or pivot point and the right side were able to swing up and to the right it would describe an arc. Also, if you continued the top edge to the right for another inch and ended it where it met the arc you would have the image above.


There are a couple of ways to work to this stage; draw an adjacent square and then the arc or continue the top edge for an additional inch and then draw the rest of the square and then draw an arc within. Either way, you should end up with two squares connected into a rectangle with a half-circle within.


This is where things get a little different. Instead of drawing another 1" square, you're drawing a 2" square. The top of your rectangle becomes the bottom of the square. I really recommend drawing the square and even quickly checking with a ruler for the first time or two you do this. When the square is done, you continue the arc from the top right corner of the rectangle to the top left corner of the new square. The arc you're drawing here is approached exactly the same manner as the previous two you've drawn; as if it's a quarter of a 4"x 4" square.
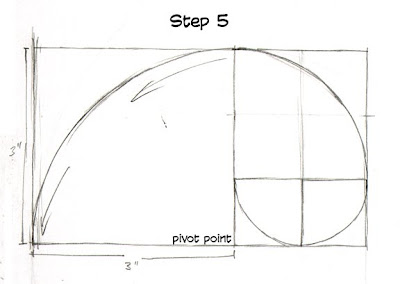
With step 5, we're appending another square to what we've already drawn. This time it's a 3" x 3" square on the left side of the just finished 2" x 3" rectangle. The arc is drawn as before: as if it were a quarter of a 6" circle.


This is the last step for a number of reasons; another square won't fit in the typical sketchbook and we're trying to get this done in fifteen minutes or less. We're drawing a 5" square adjacent to the bottom of the 5"x 3" rectangle and, again drawing an arc. You'll end up with a 5" x 8" rectangle with a nicely drawn spiral arc.


Apart from getting comfortable with one of the more interesting elements of composition, you'll be further developing your ability to guage distance as well as develop more line control as you draw both longer straight lines and increasingly larger curves.


I really appreciate seeing the work you guys have been doing, but it's killing my inbox right now. If you'd like to share it with me and anyone else, I suggest getting a free account at someplace like photobucket or flickr and drop a link in the comments section so everyone can follow your progress.

~R

Monday, 15 December 2008

Drawing From Zero to Sixty

I’ve been thinking a great deal about drawing instruction again – not necessarily as it applies just too drawing comics, but how drawing instruction in my experience is usually handled overall.

While I am teaching again this spring, I’m not teaching drawing. So, to sate that part of me that needs to pass along that sort of knowledge, I think I’m going to use this blog as an outlet. While I bet I’d get a great deal more interest showing people how I draw hot babes or monsters, it wouldn’t be playing to my interests as much (though I am interested in drawing hot babes and monsters). I really want to deal with some of the key things that I believe can make people draw better.

Most courses and books start out by giving the aspiring artist something to draw; a geometric shape, a model, a still life or, should the teacher be an idiot, a photo. These kids are asked to go from zero-to-sixty in the first lesson and most instructors are too far developed in their own experience to really understand how many developmental steps they may be skipping. As important as observational drawing is the historic methods haven’t really been reconsidered for some time.

Really, what are the required developed skills to do good observational drawing?
Hand-eye coordination – being able to get your hand to make the marks where you want them on the drawing surface. This deals with one of the first abstractions of drawing: reducing the three-dimensional to two dimensions.
Spacial analysis – the ability to see the relationships of various parts of the subject either by distance or differing angles.
Line control – once you’re making the marks where you want them you have to be dealing with one of the illusions you have to create when representing three-dimensional objects on a two-dimensional surface. Your line can indicate texture, volume, weight, depth, and value.

I’m going to stop right there. it's enough to start with.

The first drawing class typically asks the student to incorporate two things that aren’t taught (hand-eye coordination and line control) as a part of the process to achieve a third that’s already quite difficult to learn. I can hear some of my former teachers voices in my head; you learn them all at once by doing them all at once. I believe that sort of educational philosophy is completely out of step with how we’re currently teaching today’s kids to learn. The teachers defending 70-year old teaching methodologies like Nicolaides’s archaic The Natural Way to Draw with their dying breaths should really just hurry up and die already. A new century calls for new methods to educate built upon the successes of previous methods. Bridgman, Loomis, Reilly, Hale, and even Nicolaides have all added great things to the arsenal of both the drawing student and instructor, but their works are several decades old and often exist independantly of each other. Looking at the educational work from artist instructors like Ron Lemen and others tells me that pushing old knowledge forward into new developmental tools is the way to go.

Now, if you ask any of my former students they know I’m possibly the biggest advocate for an artist keeping a sketchbook, so my first reflex to develop learning tools will involve daily use of a cheap black hardcover book. I’m also a booster for aggregate teaching methods; show the student something, make sure they understand it and can work with it then show something to add to it. Lessons develop slowly, but the gradually increasing complexity has a similar effect to resistance training with weights. You may not be able to bench press 200 pounds the first time you enter the gym, but by continually and gradually increasing the weight you can press you eventually reach the 200 pound target and surpass it.

So, the goal isn’t for the student to gain immediate hand-eye coordination, but to start developing it. As that hand-eye coordination grows we ask the student to start seeing special relationships. Once the student is utilizing both hand-eye coordination and demonstrating a growing facility with seeing angles and distances they are tasked with controlling the marks they make both in weight, thickness and flow.

Over the next few weeks I’m going to create three sketchbook exercises that will help anyone interested in following along develop towards drawing better. The goal will be 15-30 minutes of sketchbook work a day. A week, perhaps two should be enough to get comfortable with the core concept of the exercise and allow the addition of the second exercise to the process, followed by the third.

First up, though, I believe I’ll have to discuss the importance of keeping a daily sketchbook.

~Richard