A sampling from this week's Open Studio Figure Drawing session. Used some willow charcoal in addition to regular charcoal for the first time in ages; forgot how much versatility it had (and I also forgot how much of it will literally fall off the paper if you roll it it up to pop into a tube). Just a gesture and a pair of longer studies. Next week is the last of the sessions -- already going to miss the weekly life drawing. There's so little of it available out in my area.
~R
Friday, 29 March 2013
Sketching a Head
Made this for my class and a friend suggested I might want to share it online. It starts with the premise you have to learn the facial/skull anatomy no matter what construction method you use, so it's likely better to start with the shape of the head you want to draw rather than force a circle, block or cylinder into that shape.
There was a whole lot of talking and demonstrations that went along with this handout, but I'm not too keen to type all that up right now. If you've any specific questions, feel free to ask in a comment.
~R
Wednesday, 27 March 2013
Tuesday, 26 March 2013
Monday, 25 March 2013
Gestures - March 21
Still catching up on posting some pics of the work from the Open Studio Figure Drawing sessions. Above is a sampling of the 1-minute gestures with Kiera-Arielle.
~R
~R
Sunday, 24 March 2013
Figure Drawing March 14
Catching up on a few things -- including posting a few pics from the open figure drawing session two weeks back. Some of the rust in my life drawing is shaking loose, but it's still rough.
Caught some interesting shadows from a studio window and liked the cool blue light colliding with the warm golden light inside the studio so I kept clicking them despite the potential for distraction.
The model, Andrae, was spectacular and will be returning for the next session at Durham College on the 28th.
~R
Caught some interesting shadows from a studio window and liked the cool blue light colliding with the warm golden light inside the studio so I kept clicking them despite the potential for distraction.
The model, Andrae, was spectacular and will be returning for the next session at Durham College on the 28th.
~R
Friday, 15 March 2013
Nightmare - Outland Collective
I little while ago I joined an artist group called The Outland Collective. Every month they do a sketch challenge and the above is a portion of my first entry there. This month the subject is 'nightmare'.
I'd love it if you all would click on over and see the fine bunch of people producing some amazing artwork there and, perhaps, take a peek at the whole sketch I did! http://outlandcollective.outlandentertainment.com/
~Richard
I'd love it if you all would click on over and see the fine bunch of people producing some amazing artwork there and, perhaps, take a peek at the whole sketch I did! http://outlandcollective.outlandentertainment.com/
~Richard
Tuesday, 12 March 2013
Figure Drawing 7 March 2013
Organised a series of five open studio figure drawing sessions at Durham College for Thursday evenings. Open studio means anyone can drop in to draw (after paying the $10 model fee) and it isn't an instructed class. Last week was the first session. . .
Gestures
5-minutes
10 minutes
15 minutes
All are charcoal on cartridge paper.
If you're in the Oshawa area Thursday night, I can't think of a better thing you could be doing!
~R
Sunday, 10 March 2013
Toronto Comicon Day Two Sketches
I added some black linework on the Thor with a Copic after the black pencil crayon could only go as dark as a pencil on the stock used for the cover, but that was after the pic was taken.
And another Wolverine.
Toronto Comicon 2013 Day One
Sketches!!!
First day of the 2013 Toronto Comicon has wrapped and I'm off for the second in a few hours.
~R
Monday, 25 February 2013
Back Drawing
Today's warm-up. Prismacolor art stick and Derwent colored pencil on paper.
Most of my warm-ups are from places like http://figuresfordrawing.tumblr.com/ , http://www.quickposes.com/pages/gesture , or various picture from deviantART.
~R
Most of my warm-ups are from places like http://figuresfordrawing.tumblr.com/ , http://www.quickposes.com/pages/gesture , or various picture from deviantART.
~R
Wednesday, 20 February 2013
Figure Drawing
Scanned one of my warm-ups to use in a poster to promote a series of open figure drawing sessions I'm wrangling at the college and thought I might as well share it.
~R
~R
Monday, 11 February 2013
Cat Sorcery
You ever do a piece of work then completely forget about it?
I've been doing it a good deal lately. Artistic alzheimers, maybe?
Here's the line art.
~R
I've been doing it a good deal lately. Artistic alzheimers, maybe?
Here's the line art.
~R
Sunday, 10 February 2013
Pencil Drawing to Non-photo Blue
There are a number of ways to convert pencil drawings to a non-photo blue colour in Photoshop but I thought I'd share my method.
Here's a snap of my desktop. I have a two monitor set-up, which is why the screencap is so wide. I'm also running Photoshop CS5 in Windows (so all my commands are Windows based). I just scanned a sketch that had some stuff I liked and a bunch of stuff that bothered me. I scanned it at 600dpi in colour, though this would work just as well starting with a lower resolution greyscale scan.
(click to enlarge as needed)
After monkeying about with the image a bit I'm ready to start drawing again. As much as I like to use PS in my work flow, I still prefer to do the drawing on paper instead of on my tablet, so I'll continue working up this drawing with pencil on paper, but with this modified sketch printed in non-photo blue. When I'm happy with the final drawing, that will be scanned and converted to non-photo blue, printed on 2-ply Bristol then inked.
I'll select all (ctrl+a), copy (ctrl_c), and then cut (ctrl+x), leaving an empty white image.
I think go into Image/Mode and select CMYK Color.
I then click on the Channels window, select the Cyan tab and paste the image within (ctrl+v)
Then I select the CMYK tab (which makes all the tabs blue). I dropped the Channels window on the image as it now appears on the screen -- it's at 100% cyan, which isn't quite where we need it. There should be nothing showing up in the Yellow, Magenta or Black tabs. I then select all (ctrl+a), copy (ctrl_c), and then cut (ctrl+x), leaving an empty white image again.
I click on the Layers tab and paste (ctrl+v). The 100% cyan image is on the new layer and the active tab.
I click on the opacity arrow in the Layers window and reduce it down to 23%. I will go as low at 20%, but below that my eyes aren't proving to be up to the task. You can go as light or stay as dark as you feel comfortable, but you'll only find out what you like after trying it a few times. Initially I printed out in the 25%+ range and found the blue showed too strongly under inks and became a distraction when looking at the original artwork. Some of this will also be dependant on your printer output. Experiment!
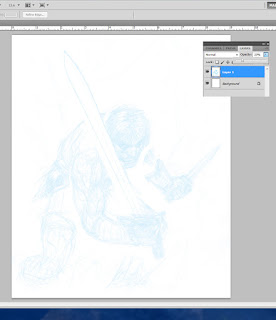
I try to strike a balance between ease of seeing the drawing while inking (or drawing over the blue sketch like I'm doing here) and having the blue essentially disappear when viewed from arm length after being inked.
I no longer do traditional pencils, so I still end up with a single piece of original art as the pencils are often very loose and on multiple pieces of bond paper.
If I decide to go further with this drawing, I'll do another post showing what I do the eliminate the blue and get the sharpest file of my inks for colouring.
~R
Thursday, 7 February 2013
Sunday, 3 February 2013
Art Prints Now on Sale!
Instructions are at the bottom of this entry.
For a few years people have been asking me to make prints available through the mail since I don't go to many conventions, and I've thought about setting something up through the blog -- perhaps a Paypal button or something similar. It kept getting put off as I never seemed to have the time to figure out how to set all that up, but, having to suddenly buy a new car did act as a bit of a prod to do something.
All these works are printed on 11x17" Pearl Finish Ilford Galerie paper (it's a very heavy paper with a very slight gloss that holds colour and detail very well.
Each print is $20.00 individually, US or Canadian.
Shipping and Handling for regular mail to the US is $15.
Shipping and Handling for mail within Canada is $21, this includes insurance.
European shipping will have to wait for now, though if you can't drop me a note and we'll see what we can do.
Both of these are the lowest rates available for securely shipping prints of this size, I do wish it was more reasonable.
Because the postal rates are what they are, I can do a little bit to help by offering a reduced price for every print after the first for $15. The Paypal button at the top right of my blog should allow things to get rolling! You will have to tell me which prints you're ordering and enter the requisite shipping for your region and if you'd like me to sign the print.
~Richard
Friday, 1 February 2013
Wednesday, 30 January 2013
John, George, and Dream's Sister
John Lennon, George Harrison, and Death
This one took forever and had quite a few false starts.
Private commission from late last year. Actually managed to forget about it between applying coats of fixative.
Graphite on 13x17" 2-ply Strathmore Bristol
~R
This one took forever and had quite a few false starts.
Private commission from late last year. Actually managed to forget about it between applying coats of fixative.
Graphite on 13x17" 2-ply Strathmore Bristol
~R
Monday, 28 January 2013
Tuesday, 22 January 2013
Alice Morgan From Luther
Another warm-up study from the Luther TV show (love my DVDs). this time it's everyone's favourite murderer, Alice Morgan (Ruth Wilson) from Idris Elba's LUTHER TV series.
Graphite on 9x12" 2-ply Bristol paper.
Subscribe to:
Posts (Atom)


